
When you upload a poster, banner, or other design to EventLive, you can now adjust how it looks before it goes live. The crop tool lets you move your image around, zoom in or out, pick the exact size you need, and choose how to fill any empty space. What you see in the crop window is what your buyers will see.
How to Use It
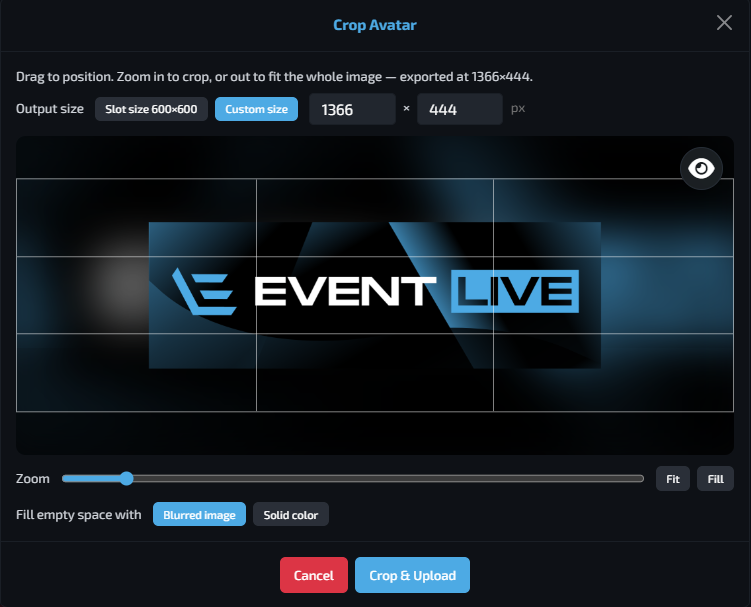
The Crop window opens automatically for each one
Choose an Output size:
Slot size uses the recommended size for that spot (for example, 600×600).
Custom size lets you type your own width and height in pixels.
The grid lines help you center it.
Use the Zoom slider to zoom in and crop, or zoom out to show the whole image. You can also use the quick buttons:
Fit shows your whole image inside the frame.
Fill zooms in until the image covers the whole frame, with no empty space.
Under Fill empty space with, choose:
Blurred image fills gaps with a soft, blurred copy of your image.
Solid color fills gaps with a single color.
When you're happy with it, click Crop & Upload. Click Cancel to start over.
Why This Matters
🖼️ No more awkward cut-offs: Make sure your logo, event name, and key details stay in view.
📐 The right size every time: Use the recommended size or set your own, so your image fits its spot perfectly.
🎨 Clean edges: If your image doesn't fill the whole space, the gaps are filled with a blurred version of your image or a solid color, instead of looking empty.
⏱️ Less back-and-forth: Adjust your design right in EventLive without going back to a design app.